Battery switch on travel trailer function is crucial for managing your RV’s power. Understanding how your battery switch works – whether it’s a simple 1-2-both switch or a more sophisticated automatic system – is key to preventing dead batteries and maximizing your off-grid adventures. This guide breaks down everything you need to know, from basic operation to troubleshooting and maintenance.
We’ll explore the different types of switches, how to diagnose problems, and strategies for optimizing battery life. Learn how to safely connect to shore power, a generator, and your RV’s batteries, ensuring a smooth and reliable power supply for all your travel trailer needs. We’ll cover installation, maintenance, and even delve into some helpful wiring diagrams.
Understanding Battery Switch Functionality in Travel Trailers
Your travel trailer’s battery switch is a crucial component for managing power, allowing you to seamlessly switch between different power sources and protect your batteries. Understanding its function is key to enjoying reliable power on the road. This section will explain the various types of battery switches, their purpose, and how to use them safely and effectively.
Types of Battery Switches in Travel Trailers
Several types of battery switches are used in travel trailers, each offering different levels of control and convenience. The most common types include the 1-2-Both switch, the rotary switch, and the more sophisticated electronic switches. A 1-2-Both switch is a simple, three-position switch that allows you to select either battery 1, battery 2, or both batteries simultaneously. Rotary switches provide a similar function but often with more positions, allowing for greater control and the possibility of adding auxiliary circuits.
Electronic switches offer advanced features such as remote control, monitoring, and automated functions. The choice depends on your needs and budget.
The Purpose of a Battery Switch in Managing Power Sources
The primary purpose of a battery switch is to manage the flow of power from your trailer’s various sources – shore power (hookups at campsites), generator power, and your house batteries (typically 12V DC). It prevents accidental draining of your house batteries when connected to shore power, and it lets you selectively use either or both batteries to power your trailer’s 12V systems (lights, water pump, etc.).
Without a battery switch, you risk damaging your batteries or overloading your electrical system. A properly used battery switch ensures you’re using the most appropriate power source at any given time.
Operating a Battery Switch: A Step-by-Step Guide, Battery switch on travel trailer function
Before operating your battery switch, always consult your trailer’s owner’s manual for specific instructions. The general procedure is usually straightforward. However, safety is paramount.
- Identify your battery switch: Locate the switch, typically found near your battery bank or electrical panel.
- Understand the switch positions: Familiarize yourself with the switch’s positions. This will vary depending on the type of switch, but generally, you’ll find options for “Off,” “Battery 1,” “Battery 2,” and possibly “Both.” Some switches might include additional positions for auxiliary circuits.
- Turn off all loads: Before switching positions, ensure all loads (lights, appliances, etc.) are turned off to prevent unexpected surges or shorts.
- Select the desired position: Carefully move the switch to the desired position. If connecting to shore power, select “Off” to disconnect the batteries. If running off batteries, select “Battery 1,” “Battery 2,” or “Both” as needed.
- Check your systems: After switching, check that your trailer’s systems are functioning correctly.
Comparison of Battery Switch Types
| Switch Type | Number of Positions | Features | Benefits |
|---|---|---|---|
| 1-2-Both | 3 | Simple on/off for each battery or both | Cost-effective, easy to use |
| Rotary | Variable (3-6+) | Multiple positions for batteries, auxiliary circuits, and potentially off positions | More versatile, allows for more control |
| Electronic | Variable, often with digital display | Remote control, battery monitoring, automated functions | Advanced features, increased convenience and monitoring |
Troubleshooting Common Battery Switch Issues
Your travel trailer’s battery switch is a critical component, controlling power flow between your house batteries and the shore power or generator. Problems with this switch can lead to frustrating power outages and potentially damage your appliances. Understanding how to troubleshoot these issues can save you time, money, and a lot of aggravation.
Common Battery Switch Problems and Their Causes
Several issues can arise with your battery switch. These often stem from corrosion, loose connections, faulty wiring, or the switch itself failing. A common symptom is a complete lack of power to your appliances, even with seemingly charged batteries. Other times, you might find your batteries draining unexpectedly quickly, or even blowing fuses repeatedly. These problems can indicate a problem with the switch, its connections, or a deeper electrical issue in your RV.
Sometimes, a simple visual inspection will reveal the source of the problem, but other times, a more methodical approach is needed.
Troubleshooting Steps for No Power to Appliances
First, always begin by checking the obvious: Is the battery switch actually turned to the correct position? It sounds simple, but it’s the most common oversight. Next, visually inspect the switch and its connections for any signs of corrosion or loose wires. Corrosion can severely impede electrical flow, causing a lack of power. Clean any corroded terminals with a wire brush and baking soda solution, then re-tighten connections.
If the problem persists, check the fuses both in the battery switch panel and elsewhere in your RV’s electrical system. A blown fuse will interrupt power flow and needs replacement. If fuses keep blowing, there’s likely a short circuit somewhere in your system – a more serious issue requiring professional attention. Finally, test your batteries with a voltmeter to ensure they are adequately charged.
Troubleshooting Steps for Dead Batteries
Unexpectedly dead batteries can point to several issues related to your battery switch. A constantly draining battery suggests a parasitic draw – meaning something is constantly drawing power even when the RV is off. The battery switch itself, if faulty, might be allowing this drain to occur, even when switched to the “off” position. In this case, carefully disconnecting the batteries while investigating the cause is crucial.
Another possibility is a problem with the charging system, preventing the batteries from recharging properly. A thorough check of your charging system (converter, shore power connection, generator) is necessary. Again, a voltmeter is your friend here – checking the voltage at the battery terminals while charging will reveal whether the charging system is functioning correctly.
Safety Precautions When Working with RV Electrical Systems
Working with RV electrical systems requires caution. Always disconnect the shore power and generator before working on any electrical components. Wear appropriate safety glasses and gloves. Never work on wet or damp surfaces. If you are unsure about any aspect of the troubleshooting process, it is always best to consult a qualified RV technician.
Improper handling of electrical systems can lead to serious injury or damage to your RV. Remember to double-check all connections and ensure everything is properly secured before reconnecting power.
Troubleshooting Flowchart
Imagine a flowchart with the following steps:
1. Start
Check if the battery switch is in the correct position.
2. Yes (Power)
Problem solved.
3. No (No Power)
Proceed to step
4. 4. Inspect switch and connections for corrosion
Clean and tighten if necessary.
5. Problem solved?
Yes – Problem solved; No – Proceed to step
6. 6. Check fuses
Replace blown fuses.
7. Problem solved?
Yes – Problem solved; No – Proceed to step
8. 8. Test batteries with a voltmeter
Are batteries charged?
9. Yes (Batteries Charged)
Suspect a short circuit or more serious electrical problem – seek professional help.1
0. No (Batteries Not Charged)
Investigate charging system.This flowchart provides a systematic approach to identify the source of the problem. Each “No” answer leads to the next troubleshooting step, systematically narrowing down the possibilities.
Battery Switch and Power Management Strategies
Optimizing your travel trailer’s power usage is key to extending battery life and enjoying comfortable off-grid adventures. A battery switch is a crucial component in this process, allowing you to manage power flow between your batteries and various power sources. Effective strategies involve understanding your power consumption, choosing appropriate appliances, and employing smart charging techniques.Understanding how your battery switch works is only half the battle; smart power management is equally important for maximizing your battery life and minimizing downtime.
So, you’re an audiophile who travels? Awesome! Check out this guide on setting up your audiophile travel setup for pristine sound on the go. It’s crucial to protect your investment, right? That’s where getting solid travel insurance comes in. Consider looking into Aon travel insurance for comprehensive coverage; you’ll want peace of mind knowing your gear is protected during your adventures.
This involves careful consideration of your energy consumption habits and the implementation of strategies to conserve power.
Optimizing Battery Life and Power Usage
Effective power management significantly extends the lifespan of your batteries. Overcharging and deep discharging are major culprits in reducing battery life. Regularly monitoring your battery voltage levels using a multimeter helps prevent these issues. Furthermore, choosing energy-efficient appliances like LED lighting and low-wattage fans can drastically reduce your overall power consumption. Finally, understanding the power draw of your various appliances allows for informed decision-making about simultaneous usage.
For instance, running the air conditioner simultaneously with the microwave might drain your batteries too quickly, especially if you are not connected to shore power.
Methods for Conserving Battery Power
Several methods can help conserve battery power in a travel trailer. One approach is to prioritize essential appliances during off-grid use. This means focusing on lighting, refrigeration (if using a 12V system), and perhaps a small fan, while avoiding high-power consumers like air conditioners or microwaves. Another method is to limit the use of electronics that draw significant power, such as laptops or televisions.
Using power strips with individual switches allows you to easily turn off non-essential devices. Consider investing in solar panels to supplement your battery power, reducing reliance solely on your batteries.
Prioritizing Power Usage Based on Available Power Sources
Prioritizing power usage is crucial for extending battery life. When connected to shore power (hooked up to a campsite’s electrical supply), you can freely use most appliances without significantly impacting your batteries. However, when off-grid, prioritize essential functions. For instance, if you have limited battery power, focus on refrigeration to preserve food, followed by lighting and other essential needs.
High-power appliances should be used sparingly or avoided altogether until you can recharge your batteries. This might involve using the microwave or air conditioner only for short bursts or when connected to shore power.
Tips for Extending Battery Life
To maximize your travel trailer battery life, consider these tips:
- Regularly inspect your batteries for corrosion and clean the terminals.
- Avoid completely draining your batteries; aim to keep them above 50% charge.
- Use a battery monitor to track your battery voltage and state of charge.
- Equalize your batteries periodically (if applicable to your battery type) to maintain their balance.
- Invest in a good quality battery charger and maintain it properly.
- Consider adding solar panels to supplement your battery power.
- Use energy-efficient appliances whenever possible.
- Turn off lights and appliances when not in use.
Installation and Maintenance of Battery Switches
Installing a new battery switch in your travel trailer might seem daunting, but with the right tools and a methodical approach, it’s a manageable DIY project. Proper installation ensures reliable power management and prevents potential electrical issues. Regular maintenance extends the lifespan of your switch and keeps your RV running smoothly.
Installing a New Battery Switch
The process of installing a new battery switch involves disconnecting the existing system, carefully wiring the new switch, and then testing the installation for proper functionality. Before beginning, always disconnect the negative terminal of your battery to prevent accidental shocks or short circuits. This is a crucial safety precaution. Consult your travel trailer’s wiring diagram to understand the existing setup and identify the correct wires for connection to the new switch.
Incorrect wiring can lead to system failures or even damage to your RV’s electrical components.
Tools and Materials for Battery Switch Installation
A successful installation requires the right tools. You’ll need a set of screwdrivers (Phillips and flathead), wire strippers/cutters, a crimping tool (if using crimp connectors), wire connectors (butt connectors or crimp terminals), electrical tape, a multimeter for testing, and of course, the new battery switch itself. Additionally, having a helper can make the process easier, especially when working with wiring and connections within tight spaces.
Safety glasses are also recommended to protect your eyes from potential sparks or debris.
Best Practices for Battery Switch Maintenance
Regular maintenance is key to ensuring your battery switch functions reliably for years to come. One of the most important practices is to regularly inspect the switch for any signs of corrosion or loose connections. Corrosion can impede current flow and lead to overheating or even failure. Tightening loose connections prevents intermittent power issues. Also, be sure to check the switch’s mounting and ensure it’s securely fastened.
A loose switch can lead to vibrations that can damage internal components over time. Cleaning the switch terminals with a wire brush and applying a corrosion inhibitor can significantly extend its life.
Battery Switch Maintenance Checklist
To help maintain your battery switch, follow this simple checklist for regular inspections and maintenance:
- Inspect for corrosion on terminals and connections – clean as needed.
- Check for loose connections – tighten as needed.
- Verify the switch is securely mounted.
- Test switch functionality – ensure all positions (battery, both, off) work correctly.
- Apply corrosion inhibitor to terminals (annually or as needed).
Regular adherence to this checklist will help ensure your battery switch provides years of reliable service, maximizing the efficiency of your travel trailer’s power system. Remember, safety is paramount; always disconnect the negative battery terminal before performing any maintenance or repairs.
Battery Switch Types and Their Applications
Choosing the right battery switch for your travel trailer is crucial for efficient power management and preventing electrical issues. The two main types are manual and automatic switches, each with its own set of advantages and disadvantages. Understanding these differences will help you select the best option for your specific needs.
Manual Battery Switches
Manual battery switches are the simplest and most affordable type. They require you to physically flip a switch to select which battery bank (house or chassis) is providing power to your trailer’s systems. This offers a good degree of control, allowing you to easily disconnect one battery bank if needed, for example, to prevent parasitic drain from a discharged house battery.
Advantages and Disadvantages of Manual Battery Switches
Manual switches are inexpensive and easy to install. Their straightforward design minimizes the risk of complex malfunctions. However, they require manual intervention to switch between battery banks, which can be inconvenient, especially in the dark or inclement weather. They also offer no protection against accidentally draining one battery bank completely.
So, you’re an audiophile who travels? Awesome! Check out this guide on building the perfect audiophile travel setup to ensure your listening experience doesn’t suffer on the road. Before you jet off, though, remember to sort out your travel insurance. Getting Aon travel insurance is a smart move; you don’t want to be stuck with unexpected medical bills in a foreign country.
Peace of mind is priceless, right? Enjoy your travels and your amazing music!
Automatic Battery Switches
Automatic battery switches intelligently manage power flow between your battery banks. They typically monitor the voltage of each bank and automatically switch to the charged bank when the other is low. This eliminates the need for manual intervention and helps prevent draining one battery completely. Several different technologies power automatic switches, such as voltage sensing, time-based switching, or a combination of both.
Advantages and Disadvantages of Automatic Battery Switches
Automatic switches offer convenience and protection against deep discharging. They simplify power management and enhance the overall user experience. However, they are generally more expensive than manual switches and can be more complex to install. There is also a small risk of malfunction, which could lead to unexpected power outages. Additionally, some automatic switches may not be as responsive as others, leading to slightly delayed switching.
Scenario Comparisons: Manual vs. Automatic
Consider a scenario where you are boondocking (dry camping) for several days. An automatic switch would be preferable, as it ensures you always have power from the strongest battery bank, preventing a complete discharge of either battery. Conversely, if you primarily use your travel trailer at campsites with hookups and only occasionally boondock, a manual switch might suffice. The cost savings could outweigh the minor inconvenience.
Choosing the Right Battery Switch
The choice between a manual and automatic battery switch depends on your budget, technical skills, and camping style. If you prioritize simplicity and cost-effectiveness, a manual switch is a good option. If convenience, automatic protection against deep discharge, and ease of use are paramount, an automatic switch is the better choice. Consider the size and number of batteries in your setup as well.
Larger systems might benefit from the automatic management offered by an automatic switch to prevent problems.
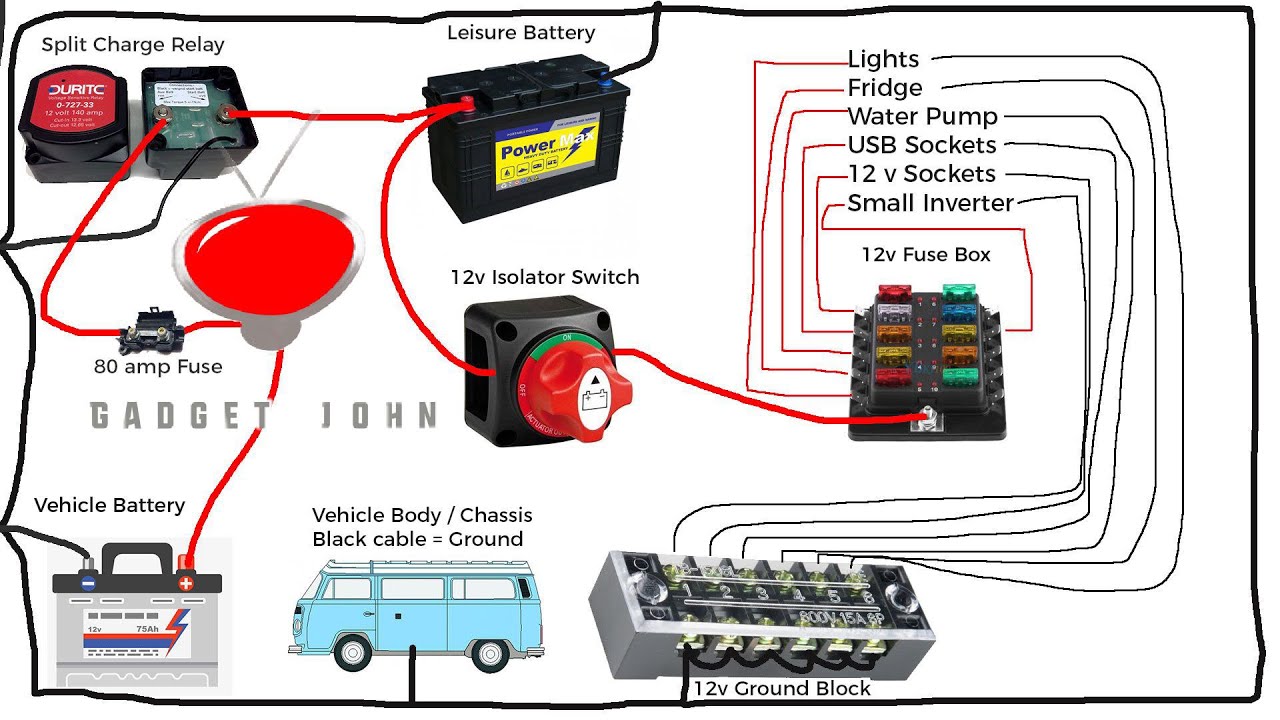
Wiring Diagrams and Schematics

Understanding wiring diagrams is crucial for safe and effective battery switch operation in your travel trailer. These diagrams visually represent the electrical pathways, allowing you to trace the flow of power and identify potential problems. Accurate wiring is paramount to prevent short circuits, blown fuses, and damage to your valuable equipment.
Simple Battery Switch Wiring Diagram
Imagine a simple system. We’ll have two 12-volt batteries (Battery 1 and Battery 2), a battery switch (with positions for “Battery 1,” “Battery 2,” “Both,” and “Off”), and a 12-volt power distribution panel.The diagram would show:
Battery 1
A positive (+) terminal connected to one input of the battery switch, and a negative (-) terminal connected directly to the chassis ground (a common ground point for the entire system).
Battery 2
A positive (+) terminal connected to another input of the battery switch, and a negative (-) terminal also connected to the chassis ground.
Battery Switch
The switch acts as a selector, directing power from either Battery 1, Battery 2, or both, to the output terminal.
Power Distribution Panel
The positive (+) output terminal of the battery switch connects to the positive bus bar of the distribution panel. The negative (-) bus bar of the distribution panel is also connected to the chassis ground.Each wire’s function is vital: The positive wires carry power from the batteries to the switch and then to the distribution panel. The negative wires complete the circuit, providing a return path for the current.
The chassis ground provides a common return path for all negative connections, ensuring a safe and efficient electrical system. Incorrect wiring, such as reversing the positive and negative connections, could lead to immediate damage or fire. Ensuring all connections are secure and properly insulated prevents shorts and arcing.
Complex Wiring Diagram with Generator and Shore Power
This diagram adds complexity by incorporating a generator and shore power connection, providing multiple power sources.The diagram will include:
Shore Power Inlet
This provides power from an external source (campground hookup). The positive wire connects to a circuit breaker, and then to the positive bus bar of the power distribution panel. The negative wire connects to the chassis ground.
Generator
The generator’s positive wire connects to a separate circuit breaker, and then to the positive bus bar of the power distribution panel. The negative wire connects to the chassis ground. This usually involves a transfer switch to prevent backfeeding from the generator to the shore power system.
Battery Switch
This remains central, controlling the batteries’ connection to the distribution panel, as described in the simple diagram.
Power Distribution Panel
This distributes power to the various appliances and systems in the travel trailer. The positive and negative bus bars remain central points for connection. Individual circuits are protected by fuses or circuit breakers.This system utilizes a transfer switch, which allows the selection of the power source (shore power, generator, or batteries). This prevents the mixing of power sources and protects against backfeeding, ensuring safety and preventing damage to the electrical system.
A failure to correctly wire this system, such as connecting the generator directly to the batteries without a transfer switch, could result in severe damage to the generator, batteries, or other components.
Safety Considerations with Battery Switches and RV Electrical Systems
Working with RV electrical systems, including battery switches, presents inherent risks if not handled properly. Understanding these risks and implementing appropriate safety measures is crucial to prevent accidents and ensure a safe RVing experience. Ignoring safety protocols can lead to serious consequences, ranging from minor injuries to significant property damage and even life-threatening situations.
Improper handling of batteries and electrical components can result in electrical shocks, fires, explosions, and chemical burns. The high voltage and amperage involved in RV electrical systems demand careful attention to detail and adherence to established safety guidelines. Even seemingly minor mistakes can have significant repercussions.
Electrical Shock Hazards
Electrical shocks pose a significant danger when working with RV electrical systems. High voltage and current can cause severe burns, muscle contractions, cardiac arrest, and even death. Always ensure that the power is disconnected at the source before working on any electrical component, including the battery switch. Never assume a circuit is dead; always test it with a reliable voltage tester.
Damp conditions significantly increase the risk of shock, so work in a dry environment whenever possible. Wear appropriate protective gear, such as insulated gloves and safety glasses, to minimize the risk.
Fire Hazards
Improperly connected or maintained electrical components can easily lead to overheating and fires. Loose connections, frayed wires, and corroded terminals create resistance, generating heat that can ignite nearby flammable materials. Battery acid leaks can also be highly corrosive and contribute to fire hazards. Regular inspection of wiring and connections is vital. Ensure that all connections are secure and free from corrosion.
Properly ventilate battery compartments to prevent the buildup of flammable gases. Keep flammable materials away from batteries and electrical components.
Safe Handling of Batteries and Electrical Components
Before handling any battery, always wear appropriate personal protective equipment (PPE). This includes safety glasses to protect your eyes from splashes of battery acid, gloves to prevent skin contact with corrosive materials, and closed-toe shoes to protect your feet from accidental drops or spills. When working with batteries, ensure adequate ventilation to prevent the inhalation of potentially harmful fumes.
Never short-circuit a battery; this can generate extreme heat and potentially cause an explosion. Always disconnect the negative terminal first when removing a battery and reconnect it last when installing a new one.
Safety Precautions During Installation and Maintenance
A systematic approach to safety is essential during installation and maintenance. Following a checklist helps ensure no steps are overlooked.
- Always disconnect the power source before starting any work.
- Use appropriate tools and equipment for the task.
- Wear appropriate personal protective equipment (PPE), including safety glasses, gloves, and closed-toe shoes.
- Inspect all wiring and connections for damage or corrosion before connecting power.
- Ensure proper ventilation in battery compartments.
- Never work on electrical components when wet or in damp conditions.
- Have a fire extinguisher readily available.
- Consult the manufacturer’s instructions for specific safety guidelines.
- If unsure about any procedure, seek assistance from a qualified electrician.
Mastering your travel trailer’s battery switch is more than just flipping a lever; it’s about understanding your RV’s power system and making informed decisions to keep your appliances running and your batteries healthy. By following the tips and troubleshooting steps Artikeld here, you’ll be well-equipped to handle any power situation on the road. Happy travels!
Questions Often Asked: Battery Switch On Travel Trailer Function
What happens if I accidentally leave my battery switch in the wrong position?
Depending on the position, you might drain your batteries or prevent them from charging. Always check your switch position before and after use.
How often should I clean my battery switch?
Inspect and clean your battery switch at least once a year, or more frequently if exposed to the elements.
Can I install a battery switch myself?
While possible, it’s recommended to have a qualified technician install a battery switch, especially if you’re not comfortable working with electrical systems.
What size battery switch do I need?
The correct size depends on your battery bank’s amperage. Consult your RV’s wiring diagram or a qualified technician for guidance.
